 |
| Click onto make larger |
I am a United States Army Flight Medic who has recently returned from a combat deployment to Afghanistan. This is an overview of Air Evac loadout of the CTOMS 2nd Line.
My bag is
set up to support my duties as a Flight Medic. This configuration is the
culmination of training, experience and shared concepts from other tactical
medical operators. There are many elements of a dismounted medic’s bag
incorporated into this setup that complement my current configuration. The
majority of the medical gear that I use regularly is part of the standard load
out for a Medical evacuation helicopter. Because of this, I do not carry many
drugs or ALS supplies. My CTOMS 2nd Line is set up to supplement equipment and
supplies that are already in the aircraft. Consequently, this allows for
working from the bag if I am on the ground for an extended period of time due
to extenuating circumstances (hoist mission, mass casualty incident, etc). With
this in mind, aside from the assessment tools, my CTOMS 2nd Line loadout is
packed within the MARCH algorithm (Massive bleeding, Airway, Respirations,
Circulation, Hypothermia). Feel free to use whatever ideas you like, but
remember that my setup and yours will probably differ based our roles and
tasks. Keep this in mind and remember that your mileage may vary.
First,
we’ll go over the outside of my CTOMS 2nd Line. When setting up a bag, I try to
place items that I will need right away or frequently use to the outer portion
of the bag, allowing me or a buddy to access these items without opening up the
entire aidbag.
 |
| Click onto make larger |
On
the outside of the bag, I have three Combat Application Tourniquets in a
Paraclete 3 magazine shingle. Next to that, I have a Tactical Tailor Accessory Pouch with
Quickclot combat gauze and vacuum packed kerlix gauze. In the top zipper
pocket, I keep three HALO chest seals for sucking chest wounds. Threaded
through the PALS webbing, I also have two 14g 3.25" catheters for
decompressing a tension pneumothorax. With this kit, I
can treat the basic injuries that need immediate intervention (Massive
hemorrhage, sucking chest wound, tension pneumothorax) without having to
even open my bag. I also carry a small handheld metal detector on the back of my bag for searching patient escorts.
 |
| Click onto make larger |
Mounted up top I have an ATS Combat Leader's Admin Pouch (CLAP) loaded with my “common use” stuff. In here I keep ear plugs, airsick bags, Tylenol, and band aids/moleskin. These are items I find myself handing out somewhat regularly so I keep them easily accessible. This is something you ground medics can use when setting up your bags as well. There’s no sense in digging through your aid bag to give Joe a band aid because he cut his finger. I carry ear plugs and airsick bags for passengers and conscious patients. Depending on the urgency of the patient and how busy I am in the back, I will try to give my conscious patients ear plugs to protect their hearing. Even a short 20 minute ride in the back of a Blackhawk can do significant damage to your hearing.
On the left side of the bag, I have a collapsible “ski pole” traction splint for managing isolated closed femur fractures, two pairs of flex cuffs for combative patients/EPWs and trauma shears. The shears are great for cutting through soft materials such as uniforms, t-shirts, and the traditional clothing worn by most Afghan civilians.
 |
| Click onto make larger |
On the right side, I carry a Benchmade Strap Cutter, cravats, and signaling tools. I highly recommend that every soldier, especially medics, carry at least one strap cutter in addition to their trauma shears. When used correctly, a good quality strap cutter is great for cutting through equipment, boots, riggers belts, and other items that prevent you from exposing your patient’s injuries. The cravats we are currently carrying are the new H&H “Super Combat Cravats” (NSN: 6510-01-587-6579). They are non-adherent and come in a sterile package to be used as burn dressings. These cravats have a multitude of uses such as making an improvised pelvic splint, securing an unconscious patient’s hands to keep them from dangling off of a litter, or making a sling and swathe. Their uses are only limited by your imagination.
 |
| Click onto make larger |
I carry signal equipment in case I end up on the ground for an extended period of time and need to signal the aircraft for recovery. In addition to IR/visible strobes carried on my body/gear, I have four chemlights – two red, two IR, as well as a battery powered lighting system. I also have a small VS-17 style marker panel and a MK 124 MOD 0 Navy Smoke and Illumination signal. This is a small, flashbang sized device with a smoke grenade on one end and a flare on the other.
 |
| Click onto make larger |
 |
MK 124 MOD 0
Click onto make larger
|
On the underside of the bag I carry a small poleless litter. Our unit found a large number of these in the scrapyard and I was able to grab a couple to experiment with. These litters have no logo on them but they appear to be from Bulldog Tactical. The litter is made of a waterproof, Kevlar-reinforced fabric with heavy duty straps and handles sewn into it.
 |
| Click onto make larger |
Here’s
the bag opened up and ready to work. One of the nice things about the CTOMS bag
is the way it’s designed to open. There
are two big, heavy duty zipper pulls that are really easy to grab in a
stressful situation where you've lost your fine motor control. Once you've opened those, the bag itself opens up into a big clam shell with the flap coming
down to the side. This gives you space to work but still keeps all of your
equipment within arm’s reach. In my opinion, it’s a definite improvement over
other bags where the cover flap goes to the bottom when opened. When using
these types of bags in training, I've found that I have to reach behind myself
to get to the items I have stowed on the flap.
 |
| Click onto make larger |
The
internal pouches are a great design. Each one is held in place with a Velcro
backing and is fully removable. This allows you to quickly swap out different
components of your load out depending on the mission. For instance, if you’re
in a garrison environment and doing medic coverage for a PT test you can pull
your hemorrhage kit that’s full of combat gauze and pressure dressings and
replace it with an ortho injuries kit full of ace wraps, ice packs, and SAM
splints. This is the only aid bag I've seen that allows you to fully customize the configuration to your mission. Another advantage of the internal pouches is
the security of the items inside them. When you open your bag, you don’t need
to worry about the contents flying everywhere in the back of a helicopter with
the cockpit doors off or on an LZ while getting blasted by rotor wash. One problem I do have with the internal pouches is the glow in the dark labels that are provided with the pouches. In concept, they're a great idea because they allow you to create your own labels with a sharpie. I've found that the writing on the labels tends to fade and wear off fairly quickly. Additionally, the glow in the dark feature tends not to work as my bag is usually closed, preventing the glow in the dark strips from charging. About halfway through this deployment I started using velcro backed labels from a Skedco bag to clearly mark the interior of my bag.
 |
| Click on to make larger |
In my “Hemorrhage” pouch I carry four
Quickclot Combat Gauze, four vacuum packed kerlix gauze, four pressure dressings, and an
abdominal dressing. The intent of these items is to control major bleeding, not
to treat minor cuts and scrapes. With this kit, I can pack/wrap wounds, apply
pressure dressings, wipe away blood, and cover eviscerations.
 |
| Click onto make larger |
 |
| Click on to make larger |
My“Airway/Breathing” pouch carries supplies
for opening and maintaining a patient’s airway as well as tools to manage a
patient’s breathing. To the left of the inner bag I have one size 5 King LT
that gives me advanced airway capability. I don’t carry size 3 or 4 due to the
limited space inside my bag and the fact that we carry those sizes inside the
aircraft. I carry a size 5 because if I am using an airway from my aidbag it
means I am probably on the ground and if I’m on the ground I’m probably
treating a US/ISAF military patient who would meet the size requirement (6
feet tall). If the patient does not meet the size requirement for a size 5 and
they need an airway I can still drop the King LT and back it out until I
confirm good placement. On the inside flap I have two NPAs and two OPAs for
maintaining simple airways in patients. I also have two 14g 3.25in needles for
needle chest decompression and surgi-lube for lubricating either the NPAs or
the King LT. In the small pocket below the pouch is an H&H cric kit for
surgical airways. I also carry an adult sized pocket BVM, a colormetric ETCO2 detector, and a portable “turkey baster” hand suction. The pocket BVM is fairly compact and allows you to carry a fully functioning BVM with O2 tubing and reservoir bag without sacrificing a lot of space in your bag. The hand suction is a very useful tool as well, as it does not take up too much space and allows you to clear your patient’s airway fairly well. It has a built in collection bag that will allow you to keep suctioning without having to stop and clear the bulb of fluid/emesis. The tip is long enough to reach the back of your patient’s airway and is wide enough that it shouldn't get clogged up easily. On top of all that, the bag it’s packaged in doubles as a biohazard bag so that you can dispose of the suction once you've finished the call.
 |
| Click onto make larger |
Inside the flap pocket I keep two HALO and two Hyfin
chest seals for treating open chest injuries (sucking chest wounds). I prefer
the HALO due to the fact that each package comes with two chest seals in one
package. The adhesive used on the HALO seems to stick a lot better to sweaty or
bloody skin than most other commonly used chest seals on the market (the
H&H Wound Seal kit also has an extremely good adhesive). As an added bonus,
the HALO chest seal’s packaging allows you to make many more improvised chest
seals if you use 3 in tape to secure them. One HALO wrapper can give you at
least four improvised chest seals in addition to the two in the package!
 |
| Click onto make larger |
In my “IV/IO Resuscitation” pouch I carry two
each of 20g, 18g, and 16g catheters along with two pre-filled saline flushes. I
also carry 2-3 homemade IV start kits. We have plenty of the North American
Rescue Products saline lock kits but I don’t like using them if I don’t have
to. The NARP kits are set up for a needled saline lock while everything else we
have uses the Luer lock system. My IV start/saline lock kits have one 18g
needle from the NARP kits, one rubber constricting band, two alcohol prep pads,
one luer-lock saline lock, one IV extension set, one large sheet of tegaderm,
and a prefilled 10ml saline flush. These are all packaged identically in a
clearly labeled ziplock sandwich bag With this kit I have everything I need to
set up a saline lock or start an IV on a patient. If I need another catheter
because I missed the vein or I want to use a different sized catheter I can
pull from the supply inside my bag.
 |
| Click onto make larger |
Inside the pouch I carry two 500ml IV bags.
At the time this picture was taken I carried one each of Normal Saline and
Hextend but due to our current protocols I now carry two bags of Normal Saline.
Each bag has a macrodrip set and an IV start kit secured to it with tape. Below
the IV bags, I keep two pressure infuser bags. These allow me to push IV fluids
at a fast rate in the aircraft and are required for pushing blood products.
Behind the pressure infusers I have a FAST-1 intraosseous device that let me
push fluids through the patient’s sternum if I’m unable to get an IV. I’ve
considered carrying an EZ-IO drill but decided against it due to the space it
would take up and the fact that we already carry an EZ-IO in the aircraft.
Additionally, the EZ-IO is battery powered with no way to replace the power
source once it dies whereas the FAST-1 does not rely on electrical power. I
can’t stop Murphy’s Law, but I can do my best to mitigate it.
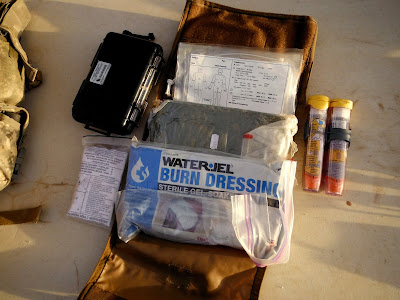
My “Miscellaneous” pouch currently holds more
H&H “Super Combat Cravats”, TC3 cards, Fox Eye Shields, two Epi-Pens, a
Watergel Burn Dressing, and a Blizzard Survival Wrap. The Blizzard Wrap is
shrink-wrapped in a package about the size of a brick. When opened, it unpacks
into a full sized space blanket that can completely cover an average sized
adult. When unpacked and fully opened, built-in air cells inflate creating a
layer of trapped air between the two layers of the blanket. This trapped air
retains heat very well and makes the Blizzard Wrap an excellent passive
hypothermia management tool.
 |
| Click onto make larger |
In the rear of the bag I have three SAM
splints and one adult sized C-collar. They fit extremely well in the back
pocket and take up almost no space. The SAM splints provide some additional
rigidity and structure to the back of the bag.
 |
| Click onto make larger |
As I said earlier, I really like the way the
2nd Line bag opens. The clamshell cover is lined with Velcro,
allowing you to attach any Velcro-backed pouches such as BFG Dappers or any of
the purpose built accessory pouches that CTOMS designed for this bag. On my
bag’s clamshell cover I gloves, assessment tools, a general purpose pouch, and
other medical supplies that I will cover further down in my review.
 |
| Click onto make larger |
On the top right corner I have a CTOMS mesh zippered pouch that carries a finger pulse oximeter, thermometer, and glucometer. I
also carry a spare carpuject and extra rolls of tape.
 |
| Click onto make larger |
 |
| Click onto make larger |
On the bottom left below my gloves is a
SOTECH medical insert that I use as a general purpose pouch. In the top pocket
I keep a spare set of trauma shears and a hemostat. Below that in the three
vertical pouches I have a tube of glucose and a
tube of bacitracin ointment. The Velcro pouch below those carries spare
batteries for my pulse oximeter and headlamp.
 |
| Click onto make larger |
Below the mesh pouch is a CTOMS MARS panel
that carries more general purpose equipment. The MARS panels are another great
part of CTOMS products. Lots of aidbags come with pre-made elastic loops built
into them by the manufacturer. Unfortunately, these loops are located where the
designer wanted them to be, not the end user. They are pre-sized to fit
specific items and they are limited in how much you can adapt them if you want
to use them for something else. The CTOMS MARS panels, on the other hand, let
you fully customize the interior of your bag the way you want it. Each panel is
Velcro backed and covered in a grid of small loops. Long sections of elastic
shock cords and elastic holders are also included. To assemble the panel, lay
the materials you want to secure directly on the panel and thread the elastic
through the grid. This modular design allows you to carry your tools securely
and in the exact location that you want them.
This
panel is set up to carry hemostats, tweezers, a penlight and
sharps shuttle, large sharpie, saline flushes, and a pen.
Here is a picture of my bag in its typical
position in the aircraft. When I’m riding in the left seat I keep it secured to
the left lower net restraint ring. This keeps my bag secured yet accessible and
I can easily reach and unhook it if I’m exiting the aircraft.
 |
| Click onto make larger |
As a Flight Medic and helicopter crew member, all of my gear must be secured inside the aircraft. This prevents items such as oxygen bags, cardiac monitors, and aidbags from becoming projectiles in the event of a hard landing or sudden maneuvering. I created my own retention leash for my aid bag using a non-locking carabiner, webbing loop from a Sked carry handle, and a quick-release shackle. I hung this strap by the carabiner from the top carry handle of the aid bag and ran the quick-release shackle to one of the aircraft's restraint rings.
 |
| Click onto make larger |
The CTOMS 2nd Line is a useful and extremely modular tool that can be tailored and
configured to each individual medic’s needs despite differences in roles and
protocols. The Velcro interior and removable insert pouches allow the user to
quickly swap out gear or replace used items with a pre-packed resupply insert.
As a Flight Medic who sometimes gets assigned to do medical coverage for
various types of training, the ability to quickly reconfigure my bag to the
mission is extremely helpful. The MARS panels that are included with the bag
are a groundbreaking idea that allow medics to carry the tools they need where
the need them, not where the bag designer wanted them. The bag’s construction
and design is very well thought out and does not waste space. The bag’s clamshell
opening allows the user to quickly have access to all of their equipment
without having to rifle through the bag or turn around to get to the flap
cover. The zippers and Velcro pouches
are designed with the chaos and adrenaline of combat medicine in mind and make
opening the bag easier under stressful conditions where fine motor skills may
be lacking. If there was anything negative about this bag, it would be
the price tag. It can be a little pricey on a
junior enlisted budget. That being said, you’re not just paying for a name
brand. You are paying for a well-designed, strongly built, quality aidbag that
will not let you down. In my opinion, this bag was worth every cent I paid for
it. It has been the only aidbag I have used since I bought it and has travelled
with me everywhere from range details to Afghanistan. I strongly recommend this
bag to any medic who is looking for a quality aidbag that can be constantly
adapted to changing mission requirements.
 |
| CTOMS 2nd Line Aid Bag in Action |
In closing, to speak again for the modularity of this bag, my configuration has
already changed since the writing of this article.


Thank you very much for this blog entry. I am looking to revising my packing list and there is a lot of useful information on this blog, especially for making my PoS STOMP II bag useful. I have some questions on this set-up of yours; is there any way I can contact you directly by email? Thanks!
ReplyDeleteGreat pics and blog brother. Have you considered adding an HME (Heat Moisture Exchanger) to your airway kit? It filters out dust from rotor wash from getting down a cric or ET Tube and also keeps the lungs humidified by recycling it's own moisture. They are about $0.45 cents and a great addition. I just discovered them and added them to our kit for medics in 10th SFG(A) here in Fort Carson. I run the website; www.prolongedfieldcare.org for the USASOC PFC working group. We have podcasts and other good shit to download, check it out and share it with your buddies if you find anything useful. Feel free to comment on anything or shoot back some recommendations of your own, you have a different perspective up there in the sky and deal with a shit ton more patients than we ever will.
ReplyDelete-Paul
We follow Prolonged Field Care. We have for a while. Your website is in our links bar. I will contact you through the website.
DeleteI am Whiskey Delta Gulf. This specific articles was written by Some Random Fireman. A friend and contributor to the blog.
Prepping for a ME Medevac deployment. Would you still recommend this bag/setup? Not really crazy about the M9 bag...
ReplyDelete